Tuesday, April 1, 2008
Protocols - OCS Web Conferencing
Conference Protocols
Office Communications Server 2007 multimedia conferencing uses a variety of protocols for signaling, conference management, data collaboration, multimedia, and communication among conference components.
SIP (Session Initiation Protocol). An IETF (Internet Engineering Task Force) standard signaling protocol for initiating, managing, and terminating sessions between one or more participants, including Internet telephone calls, multimedia distribution, and multimedia conference sessions.
HTTP (Hypertext Transfer Protocol). A standard Internet protocol that in Office Communications Server 2007 is for communication between the Focus and conferencing servers, downloading Address Book Server updates to clients, and downloading meeting content to users.
C3P (Centralized Conference Control Protocol). A custom protocol for communicating conference creation and control commands from clients to Office Communications Server 2007. C3P commands are carried as XML in SIP SERVICE or INFO messages.
PSOM (Persistent Shared Object Model). A custom protocol for transporting Web conferencing content.
SRTP (Secure Real-Time Transport Protocol). An IETF standard protocol that is used in Office Communications Server 2007 for securely transporting audio and video content to various media devices.
RTCP (Real-Time Control Protocol). An IETF standard protocol used in conjunction with SRTP to convey information about the signal quality of an audio-video conferencing session to various media devices.
OCS 2007 - Authentication Issues [0xC2FC200D]
Failure [0xc3fc200D]
It is common to run across communication and authentication issues when deploying OCS. One of the tricks is trying to determine the root of problem. Failure codes and results are not always self explanatory and let’s just face it OCS 2007 being a new product does not have a whole lot of available support resources yet. This article addresses an authentication problem that generally stumps many implementers. The validation wizard usually picks up on this issue; however it does not scream out “here is the problem” fix me. Generally the results make no mention of a little thing called Server Principal Name (SPN), which is truly the underlying problem. The image below displays a typical authentication error during validation, that is a direct result of an incorrectly registered SPN for the Office Communication Server (Standard or Enterprise). The sections below will provide a brief explanation of the issue as well as troubleshooting and remediation of the problem.
Failure [0xC3FC200D] One or more errors detected

Explanation:Registration failure upon authentication is attributed to the Server Principal Name (SPN). The Kerberos protocol authentication that is used by the Office Communications Server service for client authentication requires the proper configuration of service principal names (SPNs) within the Active Directory® Domain Services. The SPN is a string that identifies the service (Office Communications Server) that a client wants to access.
For proper operation of the Kerberos authentication, the SPN of the Office Communications Server must be registered in Active Directory under the name of the user account where the service runs, typically RTCService. If the SPN of the server is registered in multiple accounts, Kerberos authentication does not operate properly.
To verify SPN is set correctly:
1. Install the OCSResourceKit for Office Communication Server 2007
2. Open a command prompt and change directories to the OCS Resource kit directory.
3. The reskit contains the “CheckSPN” script that can be used to validate the SPN for the OCS Enterprise or Standard edition server.
4. First run the tool to find all SPNs registered under a specific user account. The default user account, where the Office Communications Server service runs, is RTCService.
>Cscript Checkspn.vbs /List /u:RTCService
Sample Error: ERROR: The SPN for
5. Next run a check to see whether the SPN for a specific Office Communications Server Standard Edition or Enterprise Edition server is registered under one account. The server is identified by its FQDN (fully qualified domain name). If there is more than one registration, the script prints the user accounts that have this SPN registered. This mode is useful for detecting that the servers SPN has been registered under multiple accounts. If this is the case, the duplicate SPNs must be deleted until there is exactly one account under which the SPN is registered. Having the same SPN registered under multiple accounts causes Kerberos protocol authentication to fail on the client.
>Cscript checkspn.vbs /check /s:ocsserver.contoso.com
If multiple entries are returned, an ERROR will be returned and that the SPN is registered incorrectly. To correct the duplicate account must be deleted.
6. Deletes the SPN for a specified Standard Edition server or Enterprise Edition server from a specified user account. This mode is useful for cleaning up duplicate SPNs
7. Once you think you have the SPN set correctly, rerun the scripts in step 4 and 5 to verify SPN.
8. Next rerun the Validation tool and verify authentication is working properly for Kerberos and NTLM.
9. Now you can test connectivity and functionality using Communicator client.
Address Book Chaos
The following article will detail procedures for resolving common Address Book configuration issues.
- Service Unavailable Issues
- Address Book authentication issues
- Address Book download errors
Service Unavailable Issue
Address Book access could be a direct result of a stopped IIS service on the ABS host. Checking for a service outage is performed from a browser and IIS Manager console.
Check that services are online:
- Open IIS Manger and navigate to the web site hosting "ABS" virtual directory.
- Check that the service for the web site is running. If it is not then start up the web site and refresh to verify the service stays online.
- Next navigate to the "ABS" virtual directory, and open "Properties".
- Under the "Virtual Directory" tab, look to see which application pool the virtual directory is using. (Default is LSGroupExpAppPool)
- Click cancel to close the properties window
- Navigate to the "Application Pools" directory within IIS.
- Check the LSGroupExpAppPool (or whichever application pool was listed in step 4) and verify the service is running. If it is not, open the Properties of the Application Pool and select the "Identity" tab.
- Verify that Configurable is selected and the Username and Password fields have values. Common issue here is that the Username is populated; however the password field is blank. This is usually a result of changed password for the service account listed. (Recommendation would be to make sure the service account listed is set within Active Directory as "Password Never Expires".
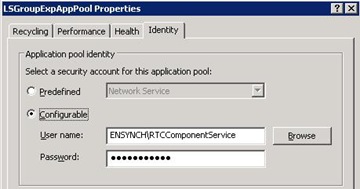
- If the password is blank, enter the password for the account and start up the service.
- Verify service stays online. Even if the password is blank or incorrect the service may start however the next time the ABS service is accessed the application pools will disable itself.
- To test... Within IIS manager navigate to the ABS\ Int\Files directory and log down one of the address book service file names. This filename will be appended to the URL entered in the following step.
- Open a browser and enter the URL to the address book server along with the full path the ABS file logged in the previous step. Example: Https://absserver.company.ad/abs/int/handler/F-0a2e3d.lsabs
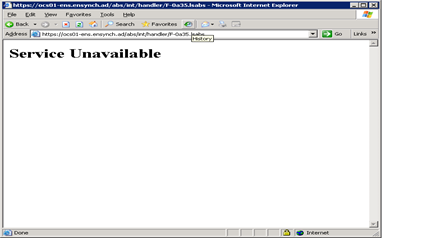
- If the Identity configured above is correct and password is valid then you will get prompt for the downloading of the file. It it was configured incorrectly you will receive the "Service Unavailable" page (listed below).
Address Book Authentication Issues
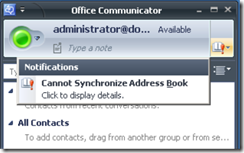
Authentication issues could range from multiple credential prompts for Address Book access, Synchronization errors, download failures, etc. The following procedures have resolved majority of the Address Book issues I have encountered
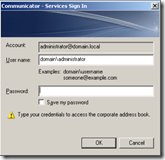
Sample images of common ABS issues:
Note: If you are experiencing Address Book issues ONLY on Windows VISTA machines and the XP or 2000 fine. Refer to my other article Address Book Download Issues (Vista machines).
Lets get started:
When starting Office Communicator, it will sign the user in but then present you with the following prompt to download the address book. Normally there is no prompt (Integrated Windows Authentication) and Communicator downloads the address book seamlessly.
When Office Communicator signs in it receives a referral from the OCS 2007 frontend to the address book URL. The default is a HTTPS URL which requires a valid certificate assigned to IIS. Before you begin troubleshooting, verify the Address Book URL that your clients are attempting to connect to.
Note: This document focuses solely on resolving issues related to Internal Address Book service connection issues. External connection issues to the Address Book service extend beyond this document, because many other factors can come into play (i.e. Reverse Proxy, Connectivity, Firewalls, etc.)
Check Internal Address Book URL and Output Location
Note: This example is retrieving the address book url for an Enterprise Pool deployment.
- Open the Office Communication Server 2007 console and navigate the Enterprise Pool. You can see the address book URL and share location in the status page for the pool . Share Location is where the full and delta Address Book files are stored which MOC client downloads.
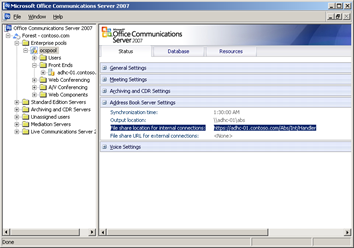
| Address Book URL | https://adhc-01.contoso.com/abs/int/handler |
Verify permissions to the Address Book Files
Verify the security configuration of the UNC path specified. Ensure that RTCUniversalGuestAccessGroup has the following permissions:
-
Share level: Read
- NTFS level: Read & Execute, List Folder Contents, and Read.
- After verifying the permissions on the share, review the IIS settings for the virtual directory. Below is an example of the structure for Abs. The Files virtual directory should be referring to the UNC path in its properties.
- After permissions are verified, run a query or lookup the membership to the RTCUniversalGuestAccessGroup. Log the membership to the group, as they will be referenced in the following section.
Verify the "Connect As" Account to the Address Book Files directory.
Ensure that we have set the correct account that will be used to access the UNC share in the virtual directory properties as in the example below.
- Referencing the same directory above "ABS\Int\Files", select Properties > Virtual Directory tab.
- Click the Connect As button.
- Verify that the account listed is a member to the RTCUniversalGuestAccessGroup. If another group was used in the previous section verify the "connect as" account is a member of that group.
Verify the Authentication Settings for the ABS Virtual Directory
Now that you have the actual location clients are attempting to access for Address Book downloads, open IIS manager and verify the Authentication Setting for that site.
- Open IIS Manager and navigate to the Web Site (ex. default website) hosting ABS virtual directory.
- Right click on the ABS virtual directory and select Properties.
- Click Directory Security tab and click Authentication and Access Control button.
- Check which authentication settings. (Internal ABS access would normally be set to Integrated Windows Authentication). We are going to assume that Integrated Authentication is selected. Continue to step 5.
- Integrated Windows Authentication will use Kerberos as the primary method of authentication, and in order for this to work the Service Principal Name (SPN) must be configured correctly for the url clients access otherwise authentication issues will exist.
Check Service Principal Name (SPN) is registered correctly
To complete this test, you must have the Office Communication Server 2007 Resource kit is installed. The tool used to check the SPN registration is the CheckSPN.vbs script.
Kerberos authentication is not possible for services without properly set Service Principal Names (SPNs). SPNs are unique identifiers for services running on servers. Each service that uses Kerberos authentication needs to have an SPN set for it so that clients can identify the service on the network. It is registered in Active Directory under a user account as an attribute called Service-Principal-Name. The SPN is assigned to the account under which the service the SPN identifies is running. Any service can look up the SPN for another service. When a service wants to authenticate to another service, it uses that service’s SPN to differentiate it from other services running on that computer.
In general, only one SPN should be set for each service. Multiple SPNs can cause clients to connect to the wrong system or the ticket may be encrypted with the wrong key.
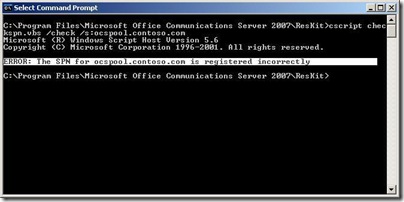
Note: Common configuration problems are the use of a virtual FQDN listed for the certificate subject name (ex. ocspool.company.com) and/or SPN is registered with multiple user accounts. Kerberos will choke when the name listed on the certificate is not an actual machine name within Active Directory and SPN is registered with multiple user accounts.
For this test you will first run the Checkspn.vbs tool against the name listed onthe ABS site's certificate subject name.
!!! The recommended configuration is one where the Subject Name on the certificate and the machine hosting ABS are one in the same. Most common configuration no,no is to use the same certificate used for the enterprise pool. This is a virtual machine name and kerberos will fail.
- Open a command prompt and navigate to where the CheckSPN.vbs file is located (default directory: C:\Program Files\Microsoft Office Communications Server 2007\ResKit)
- Run the checkspn script: /abs/int/handler">/abs/int/handler">/abs/int/handler">/abs/int/handler">/abs/int/handler">/abs/int/handler">/abs/int/handler">/abs/int/handler">http://<serverFQDN>/abs/int/handler
> cscript checkspn.vbs /check /s:<serverFQDN>
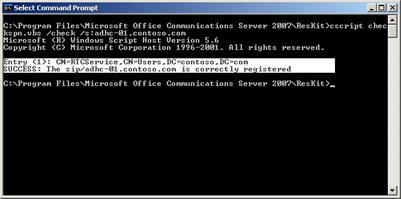
- Verify that you receive "SUCCESS" results. If you receive an error, reference the Office Communication Server 2007 Resource Kit Readme file for steps to resolve. This document will be located within the same directory as Checkspn.vbs.
In Addition to check modify SPNs you may have to use the SETSPN utility provide with the Windows 2Kx Support Tools. For how to use this tool reference the following site(s).
Service Logon Failures due to incorrectly set SPNs: http://technet2.microsoft.com/windowsserver/en/library/579246c8-2e32-4282-bce7-3209d1ea8bf11033.mspx?mfr=true
Below is an example of an incorrectly registered SPN. This error was generated because the name listed is a virtual name and not an actual machine name registered in AD. The following error was resolved by assigning the certificate Subject Name the name of the actual machine FQDN hosting ABS and changing the Address Book URL listed with OCS 2007 console. To change Address Book URL location, proceed to the next section.
IMPORTANT!
Typically the ABS location, Meeting Content download location, and distribution list expansion virtual directories fall under the same Web Site, which in turn use the same certificate. If for whatever reason the ABS URL Location is change, the meeting content download and distribution list expansion URL locations must also be modified to function properly.
Change ABS URL Location(s)
Reasons for changing the ABS URL:
- Resolving SPN issues
- Moving ABS location to another server
- Incorrect URL entered during installation of OCS 2007
Note: ABS URL changes cannot be changed within the OCS console. They have to be modified through WMI (wbemtest.exe).
- Logon to the Standard Edition or Enterprise Pool server with an account that is a member of the RTCUniversalServerAdmins group.
- From a command prompt run wbemtest.exe
- In the Windows Management Instrumentation tester window and click Connect
- In the Connect dialog box, in Namespace, type root\cimv2, and then click Connect
- In the Windows Management Instrumentation Tester dialog box, click Query button
Enter the following query- Standard Edition Server: In the Query dialog box, type the query, such as:
Select * from MSFT_SIPAddressBookSetting where backend="(local)\\rtc"” - Enterprise Pool: In the Query dialog box, type the query, such as:
Select * from MSFT_SIPAddressBookSetting where backend = ”BackendServerName\\DatabaseInstanceName”.
- Standard Edition Server: In the Query dialog box, type the query, such as:
- In the query results box double-click the results.
- Select value you wish to edit. Example(ExternalURL), and then click Edit Property.
- In the Property Editor dialog box, click to select the NOT NULL option.
- In the Value box, type the external Web Farm URL in the following format, and then click Save Property and Save.
https://externalURL.domain.com/abs/Ext/Handler - Click Save Object and then click Close.
- Click Exit.
IMPORTANT!
If the Address Book URL has been changed you most likely will have to modify the Meeting Content Download URL, and Distribution List Expansion URLs. To do this reference the following section.
Change WMI Setting for Meeting Content and Meeting Content Metadata folders
- Logon to the Standard Edition or Enterprise Pool server with an account that is a member of the RTCUniversalServerAdmins group
- From a command prompt run wbemtest.exe
- In the Windows Management Instrumentation tester window and click Connect.
- In the Connect dialog box, in Namespace, type root\cimv2, and then click Connect
- In the Windows Management Instrumentation Tester dialog box, click Query button.
- Enter the following query
- Standard Edition Server: In the Query dialog box, type the query, such as:
Select * from MSFT_SIPDataMCUCapabilitySetting where Backend = “(local)file://///rtc” - Enterprise Pool: In the Query dialog box, type the query, such as:
Select * from MSFT_SIPDataMCUCapabilitySetting where Backend = ”BackendServerName\\DatabaseInstanceName”.
Example (If default instance): Select * from MSFT_SIPDataMCUCapabilitySetting where Backend = "SQLServer"
Note: When entering the sql statement make sure to have a carriage return following the command.
- Standard Edition Server: In the Query dialog box, type the query, such as:
- In the Query dialog box, click Apply.
- In the Query Result dialog box, double-click MSFT_SIPDataMCUCapabilitySetting
- In the Properties box select the property that you wish to change (i.e. MeetingMetadataLocation and MeetingContentLocation), edit the values and enter the correct UNC path and save property.
- Click Save Object, and then click Close.
- Click Exit
Change WMI Setting for Distribution List Expansion
- Logon to the Standard Edition or Enterprise Pool server with an account that is a member of the RTCUniversalServerAdmins group.
- From a command prompt run wbemtest.exe
- In the Windows Management Instrumentation tester window and click Connect
- In the Connect dialog box, in Namespace, type root\cimv2, and then click Connect
- In the Windows Management Instrumentation Tester dialog box, click Query button
- Enter the following query
- Standard Edition Server: In the Query dialog box, type the query, such as:
Select * from MSFT_SIPGroupExpansionSetting where backend="(local)\\rtc"” - Enterprise Pool: In the Query dialog box, type the query, such as:
Select * from MSFT_SIPGroupExpansionSetting where backend = ”BackendServerName\\DatabaseInstanceName”.
- Standard Edition Server: In the Query dialog box, type the query, such as:
- In the query results box double-click the results.
- Select value you wish to edit. Example(ExternalDLExpansionWebURL), and then click Edit Property.
- In the Property Editor dialog box, click to select the NOT NULL option.
- In the Value box, type the external Web Farm URL in the following format, and then click Save Property and Save. https://externalURL.domain.com/abs/Ext/Handler
- Click Save Object and then click Close.


