Many people feel that installation of Exchange Update Rollup is a nightmare, and I agree; however I have created a checklist to step through to make sure your Rollup installs successfully on the Exchange 2010 Server
Pre-Install Check list is below:
Known Issues & Pre Installation Checklist
0. Disable User Access Control (Optional)
You can save yourself the hassle of experiencing installation failures, and disable UAC. However it is not always an option, because there may be an outage if the servers are not fault tolerant, etc..
IMPORTANT: If you are going to disable UAC (Which is not appealing to many), make sure that they proper steps are taken for the restart.
If you dont feel like disabling UAC temporarily, then you can try to run the installation “RUN AS ADMINISTRATOR”. .
Note: U can re-enable UAC after rollup installs.
1. Previous Interim Update (IU) Exists, Remove/Uninstall
Microsoft releases critical IUs for Exchange outside the Rollup schedule and can be obtained by contacting PSS. If you attempt to install the Rollup prior to removing the IU, you may get an error.
Prevention Step: Any installed IUs must be removed prior to applying a Rollup.
2. Permission Required
It is recommended to use the same account which was used to install Exchange server while installing Update Rollups.
If you have to use different account then make sure that you have highest permission like Exchange Organization Admin and a member of Local Admin group of Exchange server.
3. Do you have CAS to CAS Proxying deployed?
Apply the update rollup to the Internet-facing Client Access servers before you apply the update rollup to the non-Internet-facing Client Access servers.
4. Do you have Outlook Web Access customization?
When you apply an update rollup package, the update process will copy over the OWA files if it is necessary. If you have modified the Logon.aspx file or other OWA files, the customizations will be overwritten to ensure that OWA is updated correctly.
Prevention Step: Always make a backup copy of any customized Outlook Web Access files before you apply the update rollup.
After you apply the update rollup package, re-create Outlook Web Access customization in Logon.aspx.
5. Status of IPv6
Do you have IPv6 enabled in “Local Area Connection”? If you have IPv6 network and ticked/enabled in Local Area Connection, then it is fine.
But if you do NOT have IPv6 network and somehow unticked/disabled in Local Area Connection, follow below steps before Update Rollup installation.
- Enable IPv6 in Local Area Connection.
- Use Registry Editor and add registry key to completely disable IPv6 on a Windows Server 2008
http://www.windowsreference.com/networking/disable-ipv6-in-windows-server-20008-full-core-installation/
This may cause Exchange services to start or from changing ‘Startup Type’ (disabled to Automatic) after installation.
6. Lack of Internet Connectivity
You may experience long installation times and you may receive the following message:
“Creating Native images for .Net assemblies”
This issue occurs because the Exchange server issues network requests to connect to http://crl.microsoft.com/pki/crl/products/CodeSigPCA.crl and look up the certificate revocation list at NGEN time for each assembly that it compiles to native code.
Because the Exchange server is not connected to the Internet, each request must wait to timeout before moving on.
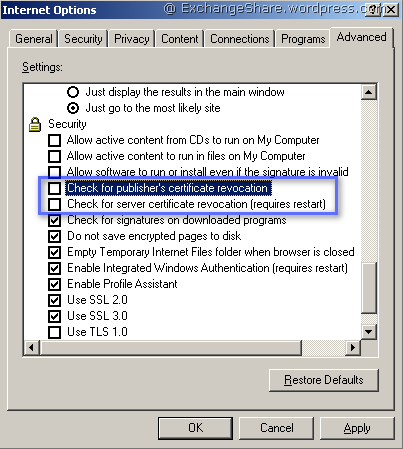
Prevention Step: Turn off the Check for publisher’s certificate revocation option on the server that is being upgraded. Follow these steps:
In Windows Internet Explorer –> Tools –> Internet Options –> Advanced tab
In the Security section, uncheck or clear the box for below tow options
“Check for publisher’s certificate revocation”
“Check for server certificate revocation”
It is considered safe to clear this security option in Internet Explorer if the computer is in a tightly controlled environment. After the setup has completed, turn on the Check for publisher’s certificate revocation option again
Further information can be found here…
Exchange 2007 managed services might time out during certificate revocation checks
http://msexchangeteam.com/archive/2008/07/08/449159.aspx
7. Unblock the Installation File
Note: If you already disabled UAC, then you should not have to perform this step.
Another check is to see if the security properties and UNBLOCK.
8. Execute the Rollup Install from a command prompt “Run As Administrator”
IMPORTANT! If the server you are about to apply the rollup to is a member of a DAG (Database Availability Group), you will have to execute additional procedures prior to the actual install of the rollup. You DO NOT want active databases on the server while you are updating it. So the active databases will have to be moved prior to the installation. For a detailed procedure reference these links:
- Procedure: http://www.ucblogs.net/blogs/exchange/archive/2009/12/15/Installing-Exchange-2010-rollups-on-DAG-servers.aspx
- Scripted procedure (also referenced in article above): http://www.ucblogs.net/files/folders/powershell/entry139.aspx
To kick off the installation:
- Open the command prompt with elevated privileges (RUN AS ADMINISTRATOR).
- Navigate to the install location and execute the installation.
- Once the installation completes, reset any of the UAC (If you disabled) back to their original settings, and reboot the machine.
- If this was a DAG member, be sure to continue with the procedure/script to complete moving the active database back to their preferred owner.


No comments:
Post a Comment